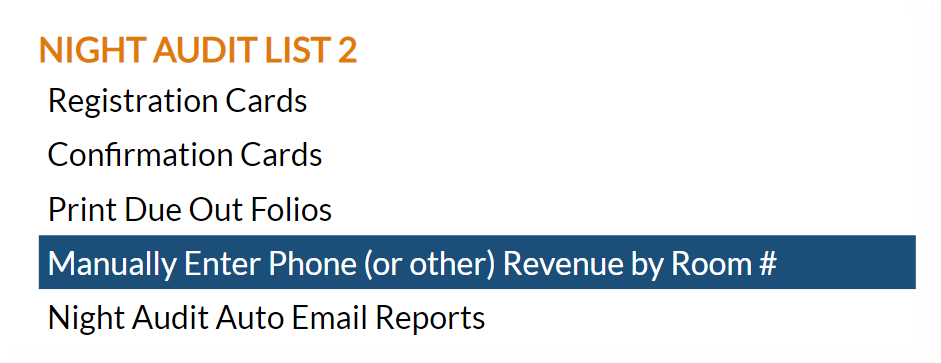
Depending on your Skyware Systems set-up, you may or may not have a quick menu option for Night Audit. If you can, Select Night Audit from the Quick Menu on the left side of the screen, then click Manually Enter Phone (or other) Revenue by Room #.
Click the icon on the left for the Full menu.
This will display the Full menu in a tabular form, with four sections, Registration, Status, Cashier and Other.
From the Other Section, select Other =>. This will display the Other Front Desk Tasks Menu, which has four sections, Other List 1, Other List 2, Documents and Web.
Select Night Audit => from the Other List 2 section of the Other Front Desk Tasks Menu. This will display the Night Audit Menu, which has two sections, Night Audit List 1 and Night Audit List 2.
Select Manually Enter Phone (or other) Revenue by Room # from the Night Audit List 2 section of the Night Audit Menu.
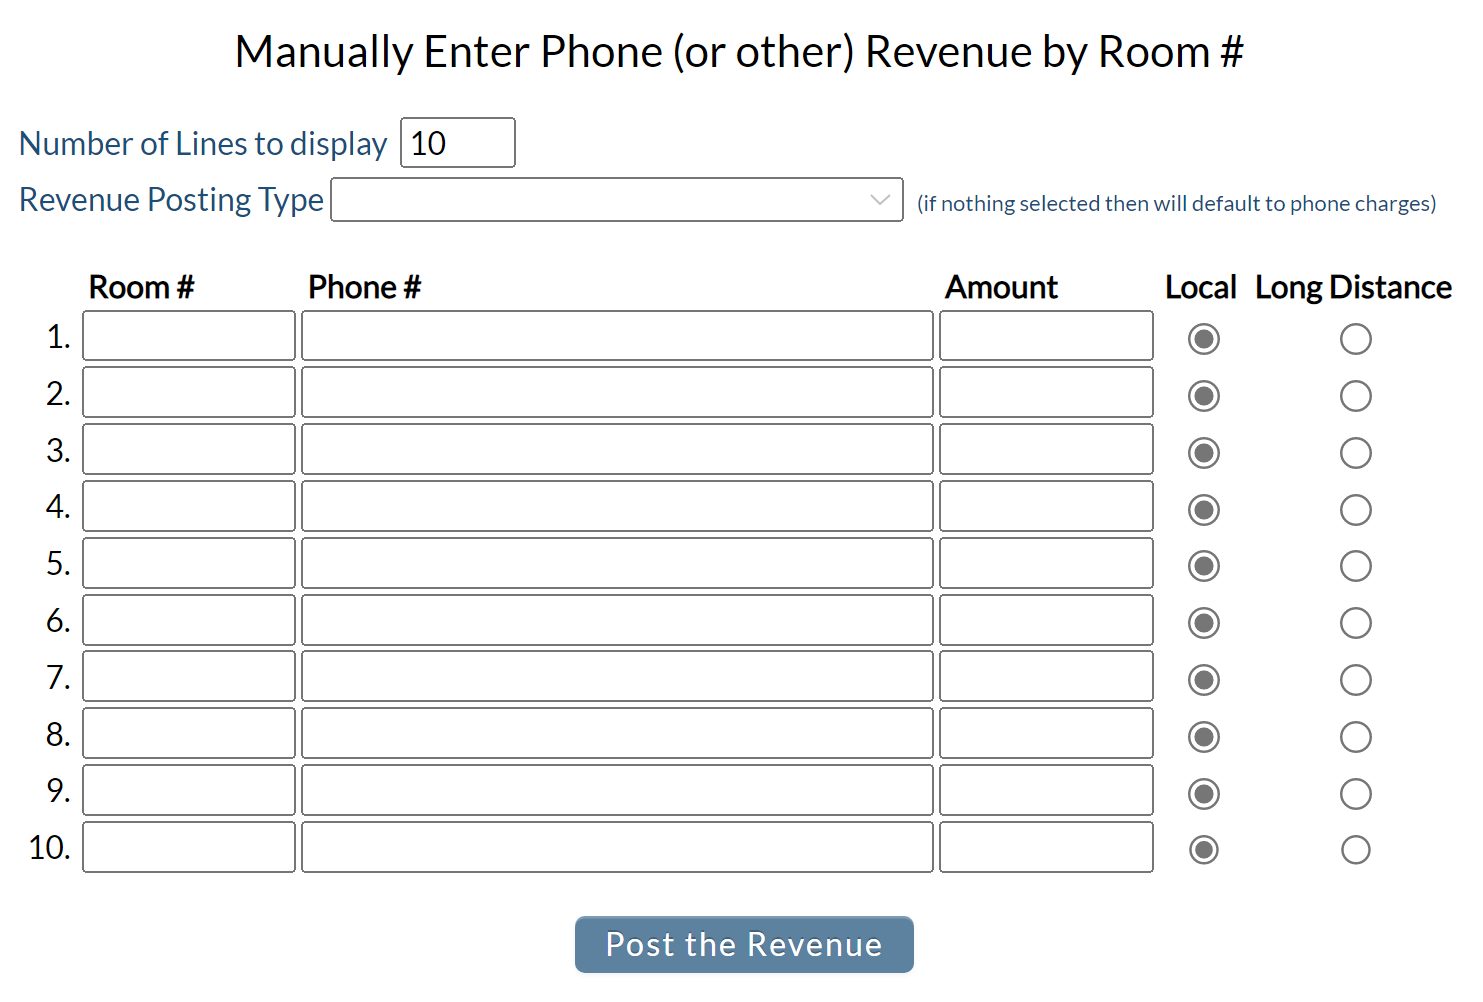
When you click on the Manually Enter Phone (or other) Revenue by Room # command, the screen will open.
Note: Different revenue posting types will have to be entered and posted separately. If you need to post charges for multiple revenue types, first post all the charges for the same revenue type, then select the different revenue posting type. Repeat for all different revenue posting types necessary.
Number of Lines to display: You can choose how many lines of revenue to display by manually typing it in. The default option is 10, but this may be changed at any point using this field. Simply adjust the number to show as many or as few lines as you wish. Each line should be used for a separate room or site number.
Your lines are displayed in a grid form, labeled by number (1-10 by default).
Revenue Posting Type: This is a drop-down menu of your available revenue type options. Choose one or leave blank; if left blank the default option is phone charges.
Room #: The first column is for the room or site number. Enter the appropriate room or site number. You will enter the room number the revenue is being posted to
Phone #: Enter the phone number for the room.
Amount: Enter the amount to be posted.
Local or Long Distance: You must also choose if the charge is due to a local or a long distance call.
Repeat this for all separate revenue charges FOR THE SAME POSTING TYPE (i.e. for multiple calls posted to the same room or any phone charges associated with different rooms).
Click the button Post the Revenue.
This will post the revenue amount entered here to the relevant room number.
Once the revenue has been posted, a message informing you of this will appear with the amount posted, and the entry in the grid will be removed.
Charges posted here may be viewed on the statement section (section 3) of the Posting Screen and Statement for the guest folio.
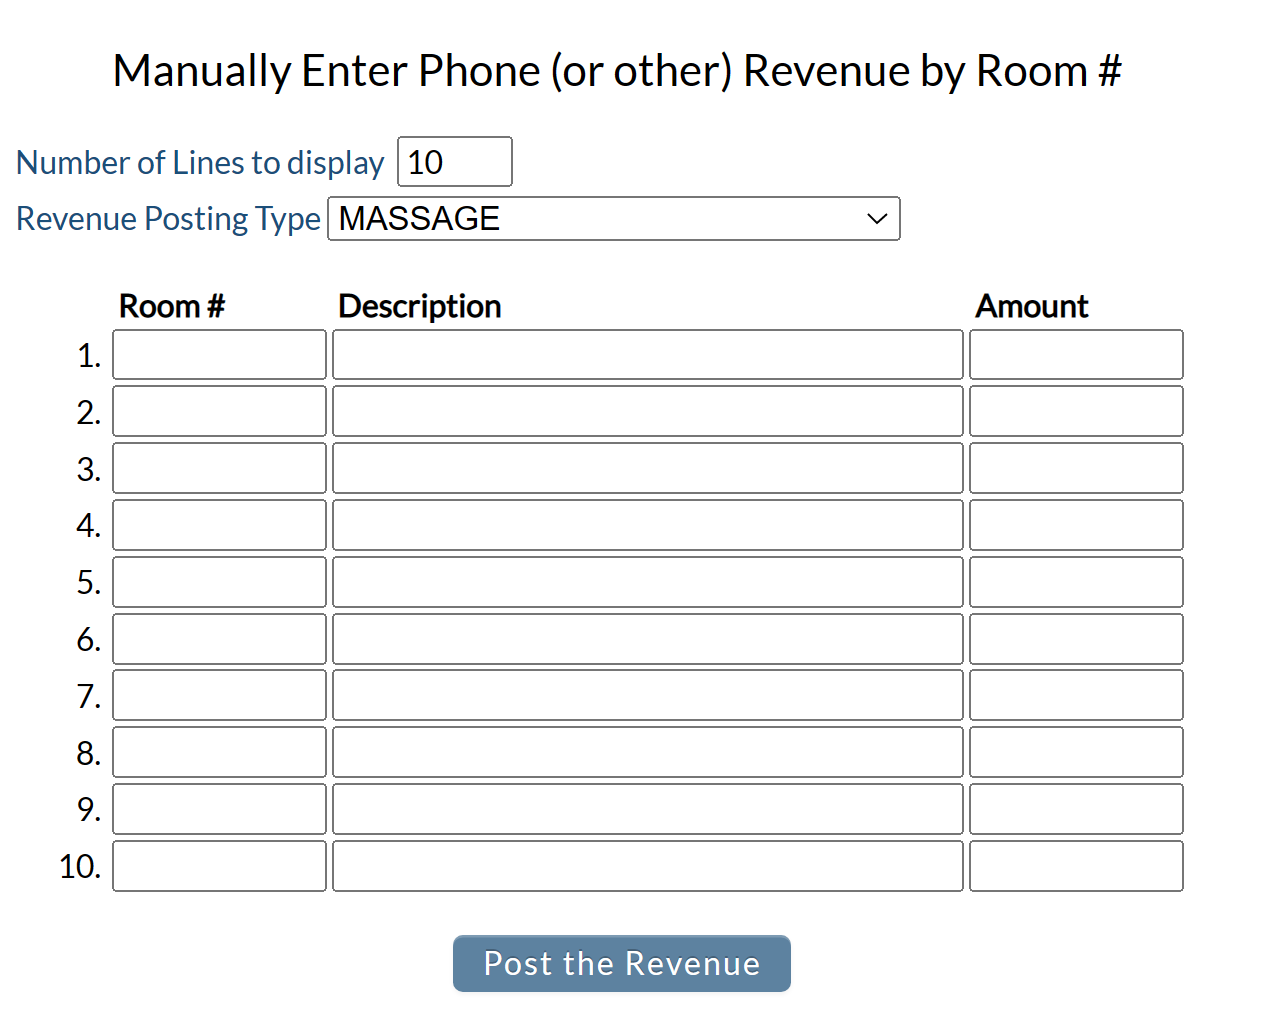
Revenue Posting Type: This is a drop-down menu of your available revenue type options. Choose the desired revenue posting type. Choosing an option OTHER than phone charges will cause the columns in the grid display to appear slightly differently; the first column is still for entering the room number, but the next column, instead of being labeled Phone #, is now called Description. The Amount column also remains, but the local or long distance bullet options are removed as they are no necessary.
Room #: The first column is for the room or site number. Enter the appropriate room or site number. Enter the room number the revenue is being posted to.
Description: Enter the description of the revenue being posted (for example with the revenue posting type MASSAGE, the description entered might be hot stones, or deep tissue; or the description may relate to the time the massage was performed for).
Amount: Enter the amount to be posted.
Repeat this for all separate revenue charges FOR THE SAME POSTING TYPE. Different revenue posting types must be entered separately.
Click the button Post the Revenue.
This will post the revenue amount entered here to the relevant room number.
Once the revenue has been posted, a message informing you of this will appear with the amount posted, and the entry in the grid will be removed.
Charges posted here may be viewed on the statement section (section 3) of the Posting Screen and Statement for the guest folio.
Also see How to Set Up and Post Charges for guest Electrical Usage for more details.
When you click on the Manually Enter Phone (or other) Revenue by Room # command, the screen will open. You will need to select the Revenue Posting Type option set as the default electric charge posting type (in this case ELECTRIC) to display the Electric Meter Entry screen.
Once selected, the Electric Meter Entry screen will be shown.
This screen appears a little differently to the Manually Enter Phone (or other) Revenue by Room # screen.
Number of Lines to display: The Electric Meter Entry screen by default shows 10 lines for use, but this may be changed at any point using this field. Simply adjust the number to show as many or as few lines as you wish. Each line should be used for a separate room or site number. Your lines are displayed in a grid form, labeled by number (1-10 by default).
Amount per KWh: This field information by default is taken from the posting type information, but may be manually altered here.
Note: If it IS altered here, the information on the Post Type Maintenance screen will be automatically updated with the new value.
Revenue Posting Type: This is a drop-down menu of your available revenue type options. For the Electric Meter Entry screen to be displayed, this MUST be selected as the default electric charge posting type.
Below the selection options the screen is displayed in grid form, with three columns, Room #, Previous KWh and Current KWh. Each line of the grid is labeled by number (1-10 by default). Information is inputted manually into this grid, then when the Post the Revenue button is clicked, the charges are calculated automatically for you using the inputted information and posted to the relevant guest folio
Room #: The first column is for the room or site number. Enter the appropriate room or site number.
Previous KWh: This number is automatically completed for you when you enter the room or site number. You may however also enter a value manually.
Note: The value automatically entered here is retrieved by Skyware from the Room Definition screen for the specific room or site number (taken from the "Last KWh Reading" field on the General tab, which shows the last KWh reading entered for the room. This number will subsequently be updated on the Room Definition screen with the value entered into the Current KWh column when the room has charges posted to it for guest electricity usage).
Current KWh: This number must be entered manually. Type in the current meter reading for the room or site number.
Repeat for as many rooms or sites as desired.
When ready, click the "Post the Revenue" button seen below the grid. Skyware will automatically calculate the number of KWh used (subtracting the value in the previous KWh column from the current KWh column) then the charges for the used KWh (multiplying the number of KWh used by the value in the Amount per KWh field), and post the amount to the guest folio.
Once the revenue has been posted, a message informing you of this will appear with the amount posted, and the entry in the grid will be removed.
Charges posted here may be viewed on the statement section (section 3) of the Posting Screen and Statement for the guest folio.


